Friday, April 16, 2010

Coraline Scarf


My daughter loves animation, so I knit up this little scarf to celebrate her birthday. I am not a big fan of color work - but this was fun to knit.

Sunday, March 7, 2010

Bulky Bootie Slippers


Needle and yarn
US 11 / 8.0 mm
0.73 skeins = 138.7 yards (126.8m)
Blue
Blue
0.75 skeins = 138.8 yards (126.9m)
Blue green boucle/370


I only used the homespun yarn because it was in my stash (and had to use it or throw it away). You can use any bulky yarn you have in place of homespun. I added the Brown Sheep to fortify the homespun and so I could slightly felt the slipper as the homespun tends to grow with wearing!

Start with toe up cast on. Here’s my favorite method, but you can use your own:

With strand of each yarn held together, cast on 12 sts

First row: ** k1, sl1; repeat from ** to last st

Second row: ** k1, sl1; repeat from ** to last st
(you are knitting the slipped sts and slipping the knit sts from the first row)

To start toe up: using two dpn, slip the first st to one needle, then next st to second needle, continue until you have slipped all sts alternately between the two needles. You will now have the start of a toe up (with no need to seam!)

You can either use the magic loop method, or add one more dpn to start knitting in the round.

First increase round: K1, yo, knit to before last st on needle, yo, k1.

Repeat for 2nd needle. You now have increased 2 sts on each needle. (You can add a third needle if you are using dpn your increases will be at beginning and end of 1st needle, then beginning of 2nd needle and end of 3rd needle)

Next round: Knit all sts (note: knit into back of yo to “lock in” the stitch so there are no holes).

Keep working increases until you have 28 sts total.

Knit around until you reach desired length to instep (you can try on as you knit)

Next, work stockinette back and forth on 16 sts (knit 1 row, purl 1 row) until you reach just before your ankle bone.

Complete short row heel.

Pick up 8 sts on side, then knit across instep sts and pick up 8 sts on opposite side. Knit across 15 heel sts, k2tog, knit to 1 stitch before instep ssk.

Turn and purl back 21 sts, p2tog, purl to 1 stitch before instep, ssk and turn, knit back to just before heel sts and k2tog.

Repeat above one more time.

Next row: knit back to 1 stitch before instep, ssk and turn, knit back to 1 stitch before instep ssk (this makes the ridge on side of slipper).

Continue until only 2 sts from instep remain then k2tog (instep sts).

Bind off and sew up. You can throw them in the wash to slightly felt for a tighter fit.

Saturday, March 6, 2010

Ravelympics 2010

The Olympics are over, and so are the 2010 Ravelympics. I found these two patterns on Ravelry, so just had to challenge myself to complete them before the end of the Olympics. It was a lot of fun, and the motivation was there because I had the deadline -- works like a charm for those of us who procrastinate!


Sunday, February 28, 2010

Purple Haze Handwarmers


PURPLE HAZE HANDWARMERS

This is my second entry for the Ravelympics2010 Designer Pattern challenge. It is a really simple pattern, and a quick knit. I hope you enjoy making a pair!

*Copyright 2010 Knitswsticks Designworks


Needle and yarn
: US 10 / 6.0 mm

Crochet Hook: size H
1 skeins = 92.0 yards (84.1m)
Purple/1174

Cast on 24 sts on size 10 US needles

K2, P2 cuff for 2 inches

Next round: Knit every round (stockinette stitch) until you reach to base of thumb.

Next round: k1 then knit 6 sts onto waste yarn, go back and knit the 6 sts with project yarn.

Continue knitting every round until you reach desired length and bind off.

Pick up 14 sts on thumb (pulling out waste yarn and picking up 1 st between to close gap).

Knit 1 round, then t2tog twice on palm side of thumb.

Continue knitting around thumb to desired length and bind off

(I use the Russian bind off to make it more elastic. Russian bind off: k1, ** slip knit stitch back to left needle and k2tog; repeat from ** to last stitch and cut yarn leaving a long enough tail to weave in and pull through last stitch. Weave in ends)

Optional: Crochet a picot edging around hand opening with size H crochet hook.

Repeat for second handwarmer & enjoy!

*Copyright 2010 - T. Oreglia (Knitswsticks Designworks)

You may use this pattern for your own personal use but you do not have permission to reprint, distribute or modify to use or sell for commercial distribution (in other words - not for commercial use), or post this pattern as your own.

Questions? Contact Knitswsticks on Ravelry.

Twists and Turns Gloves


This is one of two patterns that I completed for Ravelymics2010. These gloves were designed for my older daughter who is an outstanding artist and is my creative inspiration.

*Copyright 2010 Knitswsticks Designworks

Twists & Turns Gloves

Needle and yarn
US 2 / 2.75 mm - 2 circular or 4 dpn
1.5 skeins = 286.5 yards (262.0m)
Brown/389
PATTERN NOTES:

------- cable 16 repeat ---------
**Set up for cable: p8, k16, p8, k30 for 16 rounds.
Next round: p8, cable 16 (slip 8 to cable needle forward, knit 8 from left needle, then knit 8 from cable needle), p8, k30.**

Repeat from ** for each cable twist
------------------------

------- cable 4 forward repeat ---------
Cable 4 forward - Knit 1, **slip 2 to cable needle forward, knit 2 from left needle, then knit 2 from cable needle. Repeat from ** to last stitch, then Knit 1, continue knitting 30 palm sts to complete round.

Knit in pattern for 4 rounds before next cable twist

------- cable 4 back repeat ---------
Cable 4 back - Knit 1, **slip 2 to cable needle back , knit 2 from left needle, then knit 2 from cable needle. Repeat from ** to last stitch, then Knit 1, continue knitting 30 palm sts to complete round.

Knit in pattern for 4 rounds before next cable twist
------------------------

START OF PATTERN:

To start: Cast on 62 sts over 2 circular needles or 3 dpn - size US 2/2.75 mm

First Round: knit 1 round

Second round: ** p8, k16, p8, k30 (repeat from ** for 3 rounds)

Fifth round: p8, cable 16 (slip 8 to cable needle forward, knit 8 from left needle, then knit 8 from cable needle), p8, k30.


CAUTION: Read ahead before completing next rounds.


Sixth round: p8, k16, p8, (follow wrist pattern below for 30 sts on palm).


(Left Twist Wrist pattern): At the same time, for twist on back of wrist: k1, ** cable back 4, k2 (repeat from ** to last stitch and k1.


Next round: ** p8, k16, p8, k30 (repeat from ** for 4 rounds)

(Right Twist Wrist pattern): k1, ** cable front 4, k2 (repeat from ** to last stitch and k1, then knit 30 palm sts.

Next round: ** p8, k16, p8, k30 (repeat from ** for 4 rounds)

(Left Twist Wrist pattern): k1, ** cable back 4, k2 (repeat from ** to last stitch and k1, then knit 30 palm sts.

Next round: ** p8, k16, p8, k30 (repeat from ** for 2 rounds)

Round Sixteen: p8, cable 16 (slip 8 to cable needle forward, knit 8 from left needle, then knit 8 from cable needle), p8, k30.

You have now completed 16 rounds total and should see your first large cable twist on back of glove (start of twist at 5 rounds, and top of twist at 16 rounds).

------------ begin large cable pattern repeat ------------------
Set up for Cable: p8, k16, p8, k30 for 16 rounds.

Cable round:p8, cable 16 (slip 8 to cable needle forward, knit 8 from left needle, then knit 8 from cable needle), p8, k30.

------------ end large cable pattern repeat --------------


Continue knitting large cable pattern repeat above until 3 1/4” from cuff edge (you can adjust this to your taste, just keep in pattern for correct number of rows between cables).


Set up for provisional thumb:

------- Right Glove------
For right glove, starting on palm side of glove, k2 on palm, using waste yarn k 10 sts, slip back and reknit using project yarn. Continue on in pattern stitch.

------- Left Glove ---------
For left glove, starting on palm side, knit to just before the last 12 sts on palm, then k 10 sts to waste yarn, slip back and reknit using project yarn. k last 2 sts on palm. Continue on in pattern stitch.
-----------------------

Continue knitting in pattern until 2” past the thumb waste yarn (or to the base of your pinkie - whichever comes first).

Knit Fingers:

TIP: If you don't want to sew in gaps between fingers, pick up 3-4 extra stitches between fingers and knit together on second round (to reduce to number required for fingers in pattern).


Pinkie
: pick up 7 sts from front and palm for pinkie (14 sts total) , slip remaining sts onto holder, then p7, k7 following same pattern as main part of glove around to desired length, then k2tog at fingertip until 4 sts remain, break yarn and thread through yarn needle. Pull yarn through last sts to close top of finger and weave in on inside of glove.

Knit 6 rounds in pattern stitch or until you are 2.5" past the thumb waste yarn (or to base of start of ring/middle fingers - whichever comes first)

Ring Finger and Middle Finger: [First for ring finger, then middle finger] - k 8 sts from front and 8 sts palm side from holder - 16 sts total (knit every round to keep in same pattern stitch as main part of glove) until desired length, then k2tog at fingertip until 4 sts remain, break yarn and thread through yarn needle. Pull yarn through last sts to close top of finger and weave in on inside of glove.

Pointer Finger: k8 sts from front and palm -- 16 sts total from holder. (NOTE: be sure to keep knitting in same pattern p8, k8 to continue pattern from main part of glove), and knit around to desired length, then k2tog at fingertip until 4 sts remain, break yarn and thread through yarn needle. Pull yarn through last sts to close top of finger and weave in on inside of glove.

Thumb: Remove waste yarn and pick up sts on thumb (20 sts total), k8 then k2tog twice (18 sts total), continue knitting around to desired length, then k2tog until 4 sts remain, break yarn and thread through yarn needle. Pull yarn through last sts to close top of finger and weave in on inside of glove.

Cuff: Pick up 52 sts around cuff and K2, P2 ribbing for 1/2" and bind off loosely in pattern.

Repeat for second glove & enjoy your warm and lovely twists and turns cabled gloves!


*Copyright 2010 - T. Oreglia (Knitswsticks Designworks)

You may use this pattern for your own personal use but you do not have permission to reprint, distribute or modify to use or sell for commercial distribution (in other words - not for commercial use), or post this pattern as your own.

Questions? Contact Knitswsticks on Ravelry.

Tuesday, January 12, 2010

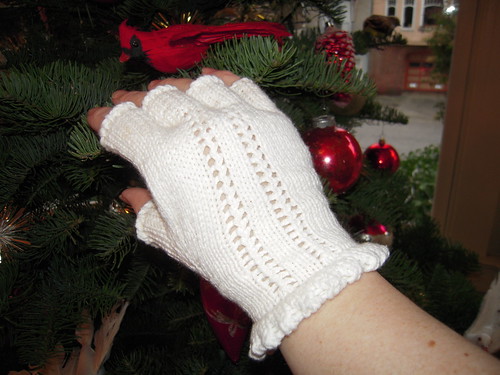
Picot and Lace Fingerless Gloves


I made these gloves for my daughter’s costume collection (as a Christmas present). The cotton works well, but used a smaller needle than recommended for this yarn to minimize any stretching out of shape issues.

Here’s how if you want to make a similar pair:

CO 40 sts on size 4 ndls- 5 rounds k, 1 round yo, k2 tog, switch to size 1 ndle k 6 rounds for picot edge, next round knit cast on edge together with next round (so you don’t need to sew up later)

Switch to size 0 needles

Knit lace pattern across hand **First round: K7, yo, ssk, k3, yo, ssk, K rest of round
Second round: K7, k2tog, yo, k3, k2tog, yo, k rest of round(knit plain on palm)** repeat from ** to ** for 2 1/4”, then started increasing sts on thumb side and on pinkie side for 3 rnds, until you have 62 sts on needle.

Switch to size 1 and continue knitting in lace pattern until 3 1/4” from picot edge. For right glove, knit across pattern side, then k2 on palm, using waste yarn k 10 sts, slip back and reknit using project yarn. (for left glove knit to the last 12 sts on palm, then k 10 sts to waste yarn, slip back and reknit using project yarn. k last 2 sts on palm, then continue same as right glove)

Continue knitting in lace pattern until 2” past the thumb waste yarn. Place sts on holder switch to size 4 ndle and k 8 sts from front and palm (16 sts total) for pointer finger, and knit around to desired length then bind off loosely. Repeat for middle finger, and ring finger. Pick up 7 sts from front and palm for pinkie (14 sts total) and knit around to desired length and bind off loosely.

Remove waste yarn and pick up sts on thumb (20 sts total), k8 then k2tog twice (18 sts total), continue kniting around to desired length, then cast off loosely.

That’s all there is to it!

Saturday, December 5, 2009

Saturday, November 28, 2009

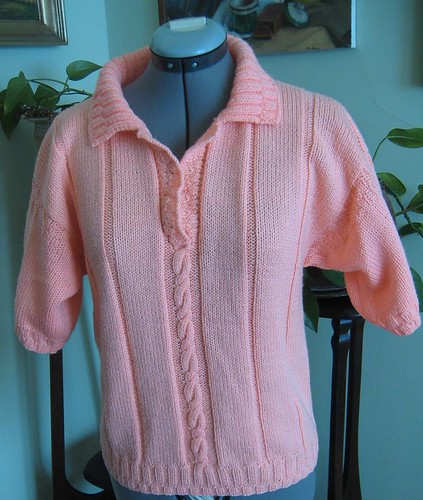
Helen's Golf Sweater (Updated)


This pattern is dedicated to my Grandmother Helen. She was an amazing knitter who could just dream up a sweater pattern and before I knew it the sweater was made (she knit so fast that her plastic needles would get too hot to hold). To my knowledge she never used a pattern, and I unfortunately do not have any of her knitting notes; she just scribbled down her calculations on scrap paper. This pattern is based on Grandma Helen's golf sweater design to honer her unique abilities as a knitter and sweater designer. I hope you enjoy knitting this sweater and think of Grandma Helen knitting it at lightning speed!

P.S. I am working on a circular version of this pattern for those who like to knit in the round -- Grandma would have loved it!

*Copyright 2009 Knitswsticks Designworks

Gauge/Tension: 22 sts and 31 rows = 10cm/4 inches in stockinette stitch

Important: Be certain to knit a swatch to check your tension for the best results and accurate fit. Adjust your needle size larger or smaller accordingly until you have the correct tension.

Needle: Size US 6 (4.0 mm) straight, Size US 6 (4.0 mm) dpn (or size needed to fit gauge), cable needle (cn) or can use dpn, Size D/3 crochet hook.

Yarn: DK or any yarn that will knit to gauge and has desired drape.

Amount: ~1200 - 1500 yards

Notions: 4 small buttons

Size: Womens Medium. For (Large, X large) cast on (104, 108) sts instead of 100 and purl these additional sts.

For example: slip 1, p4 at beginning of row, before starting pattern at K14 sts, continue in pattern to just before last 5 sts, and p5 sts at end of row, 108 sts total for X-Large.

------------ cable stitch guide -------------

R cbl stitch: sl 3 sts to cn and hold to back, K3, K3 from CN.

----------------------------------------------


FRONT (broken rib stitch)

Ribbing: Cast on 100 sts over two needles for elastic edge. Slip first stitch, *K2, P2 ribbing to last st on needle and K1. Continue ribbing back and forth; slip first stitch, and knit the K sts and purl the P sts for 6 rows - 1/2".

Next row: Slip first stitch, *P2, K2 ribbing to last st on needle and P1. Continue ribbing back and forth; slip first stitch, and knit the K sts and purl the P sts for 12 rows - 1 1/4".

18 rows total from cast on.


PATTERN STITCH FOR MAIN PART OF SWEATER

---------------- begin small cable stitch ----------------

( small cable stitch)

First row: slip first st as if to purl, then K14, P2, K12, P2, K12, P4, K6, P4, K12, P2, K12, P2, K14, P1
Next row: slip first st as if to purl, then P14, K2, P12, K2, P12, K4, P6, K4, P12, K2, P12, K2, P14, K1
Third row: slip first st as if to purl, then K14, P2, K12, P2, K12, P4, K6, P4, K12, P2, K12, P2, K14, P1
Next row: slip first st as if to purl, then P14, K2, P12, K2, P12, K4, P6, K4, P12, K2, P12, K2, P14, K1
Fifth row: slip first st as if to purl, then K14, P2, K12, P2, K12, P4, R cbl st, P4, K12, P2, K12, P2, K14, P1
Sixth row: slip first st as if to purl, then P14, K2, P12, K2, P12, K4, P6, K4, P12, K2, P12, K2, P14, K1
---------------- end small cable stitch ----------------


---------------- begin large cable stitch ----------------

(large cable stitch)

First row: slip first st as if to purl, then K14, P2, K12, P2, K12, P4, K6, P4, K12, P2, K12, P2, K14, P1
Next row: slip first st as if to purl, then P14, K2, P12, K2, P12, K4, P6, K4, P12, K2, P12, K2, P14, K1

Repeat these two rows 4 more times (10 rows).

Eleventh row: slip first st as if to purl, then K14, P2, K12, P2, K12, P4, R cbl st, P4, K12, P2, K12, P2, K14, P1
Twelfth row: slip first st as if to purl, then P14, K2, P12, K2, P12, K4, P6, K4, P12, K2, P12, K2, P14, K1
--------------------- end large cable stitch ---------------

Repeat small cable stitch pattern followed by large cable stitch pattern rows alternating until you reach underarm (74 rows or 12") or desired length to underarm & Mark this row on both sides with stitch marker or safety pin.

Continue working front in pattern stitch for additional 15 rows (2"). You will have 14 cable twists total (7 small and 7 large cable twists alternating).

Shape neck:

Knit in pattern stitch to the purl stitches just before you get to the 6 sts R cable twist (49 sts) - purl 3 sts, slip next 8 sts to holder or safety pin (you will have 1 stitch each side of the 6 st R cable twist on stitch holder). Join new ball of yarn and purl 3 sts. Continue in pattern stitch starting at K12, P2, etc. on the right side of the sweater.

Right Shoulder:

Continue knitting in pattern stitch back and forth on the right side of the sweater following pattern stitch until length from underarm to shoulder is 9 1/2" (~78 rows). Bind off shoulder loosely.

Left Shoulder:

Same as right shoulder.


BACK:

Ribbing: Cast on 100 sts over two needles for elastic edge. Slip first stitch, *K2, P2 ribbing to last st on needle and K1. Continue ribbing back and forth knitting the K sts and purling the P sts for 6 rows - 1/2".

Next row: Slip first stitch, *P2, K2 ribbing to last st on needle and P1. Continue ribbing back and forth, slipping first stitch then knitting the K sts and purling the P sts for 12 rows - 1 1/4".

Begin Pattern stitch - main part of sweater back:

Repeat small cable stitch pattern followed by large cable stitch pattern rows until you reach underarm (74 rows or 12") or desired length to underarm & Mark this row on both sides with stitch marker or safety pin.

Continue in pattern stitch until piece measures 21" from cast on edge. You will have 24 cable twists total (14 small and 14 large cable twists alternating). Bind off loosely.

Prepare for arms:

Sew front to back sides together up to where you placed your stitch marker or safety pin to beginning of underarm. Sew left and right shoulders to back.

ARMS:

Pick up and knit 80 sts around arm opening using size 6 US dpns (or small circular needle in size 6 US if you have one). P2, K2 for 6 rows - 1/2" then K2, P2 for 6 rows - 1/2" (broken rib). You will have 12 rows total of broken rib.

Next row: start stocking st from top of shoulder (knit every round) K40 sts, PM, K40 sts. K three rounds then on 4th round knit to 2 sts before marker, k2 tog, slip marker, ssk, continue knitting stocking stitch to complete 4th round.

Repeat these 4 rounds three more times. After last decrease, remove stitch marker.

Next row: Continue in stocking st for 26 rounds until arm measures 6 1/2" from edge of caston sts at armhole. Begin broken rib P2, K2 for 6 rows - 1/2" then K2, P2 for 6 rows - 1/2". Bind off loosely.

Repeat for second arm.

FRONT NECK OPENING - LEFT SIDE

Pick up 40 sts on left front opening.

First row: Slip one stitch to needle from holder and P2 tog, P1, *P2, K2 and continue ribbing in pattern from * to end.

Second row: K2, P2 ribbing to last stitch left on needle. Slip one stitch to needle from holder and P2 last 2 sts tog.

Repeat these two rows until you have 4 rows of ribbing.

Fifth row: Slip one stitch from holder to needle and K2 tog with first stitch, K1, *P2, K2 continue ribbing in pattern from * to end.

Next row: P2, K2 ribbing to last stitch on needle. Slip one stitch to needle from holder and P2 last 2 sts tog.

Repeat these two rows until you have 4 additional rows of ribbing (8 rows total from edge). All stitches that were placed on holder (safety pin) should have been knit off holder one row at a time. Total ribbing length = 1"


FRONT NECK OPENING - RIGHT SIDE

Pick up 40 sts on right front opening. K2, P2 ribbing back and forth for 4 rows.

Next row (button hole): K1, P1, K2, *P1, Yo, P2 TOG, K2, P2, K2 (repeat from * 4 times for 4 button holes). P2, K1.

Continue rib pattern knitting the K sts and purling the P sts until band is 1" (8 rows) total from start of broken rib st. Bind off loosely.

Note: Right side will overlap left side to form an opening that can be buttoned closed. At the bottom of the neck opening (base of V), sew bottom of right side of band to bottom of left side of neck band - overlapping right to left at the base of the neck opening.

COLLAR

Pick up 112 sts with right side facing starting 1/2" into front neck opening (start at forth row of first rib portion of broken rib on front neck opening). K1, P2, *K2, P2 continue from * to last 2 sts, P1, K1. Continue in rib pattern knitting the K sts and purling the P sts for 2".

Next row: K3, *P2, K2, continue from * to last 2 sts, K2. Continue in rib pattern knitting the K sts and purling the P sts for 1/2" . Bind off loosely.

Finishing:

Using size D/3 crochet hook, sc around collar and neck opening. Block lightly and sew on 4 buttons in line with button holes.

*Copyright 2009 - T. Oreglia (Knitswsticks Designworks)

You may use this pattern for your own personal use but you do not have permission to reprint, distribute or modify to use or sell for commercial distribution (in other words - not for commercial use), or post this pattern as your own.

Questions? Contact Knitswsticks on Ravelry.

Thursday, November 26, 2009

Child's Sweater (size 8)

Gauge: 8 stitches to the inch & 11 rows to the inch. Be sure to knit a swatch to check your gauge for best results and proper fit.

Needles: US Size 2 (2.75 mm) straight needle, US size 1.5 (2.5 mm).

Yarn: DK for denser knit fabric or fingering for a sweater with more drape.

Measurement: Chest - 26 inches
Length - 16 1/2 inches
Sleeve Length - 14 inches


BODY FRONT AND BACK

With smaller needle cast on 104 stitches - K2, P2 for 2 inches.

Switch to larger needle and knit in stocking st (Knit 1 row, purl 1 row) with the exception of the first and last 2 stitches of each row, which should be knit garter stitch to make a neat underarm seam (in other words, knit the first and last 2 stitches of each row, every row), until the sweater measures 10 1/2 inches.

To begin armhole, knit and then slip on safety pin the first 7 stitches, Knit 90 stitches, slip on safety pin the last 7 stitches.

Knit stocking st, the with exception of the first and last 2 stitches of each row, which should be knit garter stitch, same as underarm, on the remaining 90 sts for 3 inches.

Knit 30 sts - K2 tog, K1. Take off and string or place on stitch holder the remaining 57 sts. Continue in stocking st on stitches left on needle (with garter st boarder at armhole) decreasing in next 5 rows by knitting together 2nd and 3rd sts from neck. Continue plain knitting (stocking st) on the 27 remaining sts for 1 inch.

Work in garter stitch remaining 27 stitches on needle for 20 rows or 10 ridges, ending at neck. Break off yarn. Leave 24 sts for front of neck on string or stitch holder.

Slip on needle the last 33 sts. Work to correspond with first shoulder. Purl back to neck with exception of the first 2 knit sts.

For back of neck cast on same needle 36 sts and purl sts from first shoulder.

Work in stocking st with the exception of the garter stitch border for 5 1/2 inches.

Cast on at each end of next row 7 sts - work in stocking st until back measures same as front, with ribbing of knit 2, purl 2 same as front.

Bind off loosely, knitting the knit stitches and purling the purled stitches.

SLEEVES:

Pick up around armhole and knit 78 sts. Knit even in stocking sts (garter stitch border) as underarm for 4 inches. Decrease at both ends of row every 1/2 inch by knitting together 3rd and 4th stitches from the ends until 46 sts remain on needle. Knit plain in stocking st until sleeve measures 12 inches. Work in ribbing of K1, P1 for 2 inches. Bind off loosely, knitting the knit sts and purling the purled sts. **** You might make your decreases a little closer together than 1/2 inch if you choose.****

NECK:

Pick up stitches around neck and work in ribbing of K1, P1 for 1/2 inch. Bind off very loosely.

Join sleeve and underarm seams.

NOTE: It is a good idea to work the ribbing on the bottom and the sleeves and the neck on a size smaller needle than the sweater is knitted on.

Sunday, February 15, 2009

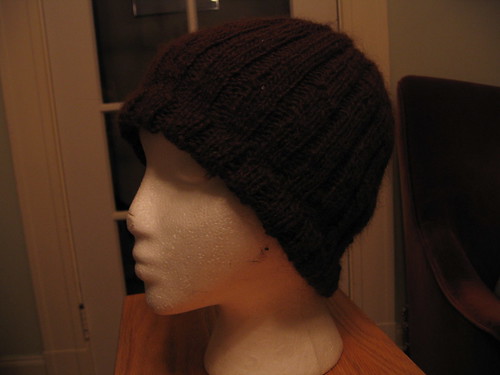
Alpaca Heaven Boyfriend Hat


I bought the brown alpaca roving at an alpaca ranch in Oregon many years ago – yes, this is the natural color of the alpaca, and I actually met the animal that so graciously provided me with this roving :-) I spun the yarn on my hand spindle, and it sat in my bin for quite awhile (years?) Finally found a pattern that seemed to suit the hand-spun yarn, and quickly knit up this hat.

My little sister is now wearing this hat with pride (and soft, fluffy, wonderful warmth - you won’t believe how soft this yarn is!) Sis always has a cold head as she works in a vegetable market, so this was perfect! Oh yeah, one more thing – I modified the edge of the hat to roll under (to make it more feminine).

Sunday, January 18, 2009

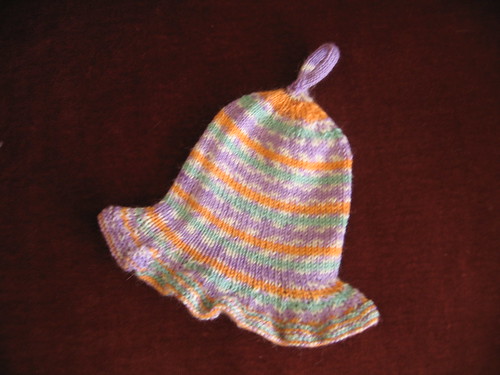
Pixie Ruffles Baby Hat


Needle and yarn
: US 2 / 2.75 m 16" circular, US 3 / 3.25 m 16" circular and US 3 DPN
: Lang Bebe Color
Amount: 1 skeins = 222.0 yards (203.0m)
: 0075 (self patterning yarn)

NOTE: Read through the pattern first as there are two different ways to begin this project. The first start is for those who do not like to purl, the second start is for those who do not like to sew a seam. Choose one of these start methods, then work on through the pattern.

-------------------------------------------------------
First start (for those who do not like to purl): With US size 2, 16" circular or straight needle, cast on 204 stitches. NOTE: Do not join until after the first 8 rows as this is the border of your hat.

Hat Border: Knit 8 rows back and forth on US size 2 - 16" circular needle or straight needle (do not join). Once these rows are complete, you will see 4 knit ridges plus your cast-on row. Knit remainder of hat in stocking stitch (knit every round after joining on circular needle).

--------------------------------------------------
Alternative start (for those who do not want to sew a seam)
: With US size 2, 16" circular, cast on 204 stitches. Join being careful not to twist and pm at beginning of round. P1 round, K1 round {repeat until you have 8 rows}.

--------------------------------------------------

Either start continues on from here:

Hat Ruffle:

First row (knit every round for stocking st in the round): If you selected the first start for those who do not like to purl, join in round taking care not to twist, and place marker at beginning of round. If you chose the alternative start, continue knitting in the round. Switch to US size 3 circular needle and knit one round.

Decrease round: Continue knitting in the round and decrease 25 stitches evenly across to marker.

Next round: Knit all stitches around to marker.

Repeat these two rows 3 times more until you have 104 stitches remaining. These four decrease rounds create the "ruffle" part of the hat.


Body of Hat:

Continue to knit every round on 104 stitches until piece measures 4 inches from end of hat boarder (where you started knit every round). Be sure to measure to check length before starting decrease rounds for the crown of the hat.

Switch to
US size 3 DPN (or use magic loop method on circular needle) and decrease as follows:

  • First round: *K6, K2 together* and repeat around to marker
  • Second round (and every alternate round): Knit
  • Third round: *K5, K2 tog* and repeat around to marker
  • Fifth round: *K4, K2 tog* and repeat around to marker
  • Seventh round: *K3, K2 tog* and repeat around to marker
  • Ninth round: *K2, K2 tog* and repeat around to marker
  • Eleventh round: *K1, K2 tog* and repeat until you have 6 stitches left on your needles.
Top Loop of Hat (Optional - if you don't want a top loop just reduce to 1 st and pull through final loop and weave in ends):

Knit around on remaining 6 stitches until you have an iCord about 2 1/2 - 3" long (more or less to your taste). Once your iCord is the desired length, knit 2 together around until you have 3 stitches left. Cut yarn leaving a long tail and pull through last loops to close off. Thread the yarn tail through a darning needle, and draw the yarn through the inside of the hat making a loop with the iCord. Turn hat inside out, secure the yarn and weave in end to finish.

If you chose to knit your brim back and forth in knit stitch, sew up the seam on the boarder (not necessary if you chose to knit in the round from beginning).


Copyright 2009 - T. Oreglia (Knitswsticks Designworks)

You may use this pattern for your own personal use but you do not have permission to reprint, distribute or modify to use or sell for commercial distribution (in other words, not for commercial use), or post this pattern as your own.


Tuesday, January 6, 2009

American Civil War Socks


As an introduction to this sock pattern, I thought I would share a little bit of military sock knitting history with you. During the American Civil War, women knitted socks for soldiers in order to do their bit for the cause. It was considered a great honor and duty for all who could provide this service (and a way for the women to participate in the war effort).

In the Chicago Times, June 25, 1862, the following verse was written:

"Soldiers brave, will it brighten the day,
And shorten the march on the weary way,
To know that at home the loving and true
Are knitting, and hoping, and praying for you?"


During this time, there was a significant lack of funds for military clothing. Socks were an item especially required, and often a "call to the needles" was published in various papers asking women to knit socks for soldiers.

I found a pattern on the internet published in the "Mobile Register and Advertiser, January 1, 1864". I thought that you might enjoy reading it (I tried the pattern, and knit up a pair of socks in modern sock yarn and larger needles. The original pattern calls for about a size 00 needle, too small for my liking!)


Original pattern can be found at:

http://www.uttyler.edu/vbetts/mobile_reg_and_adv_64.htm


I modified the pattern to use size 2 needles and modern sock yarn (self striping to jazz them up), and cast on 64 stitches at the cuff so I can wear them -- grin.

Also, when you read the pattern - "plain = knit" and "seam = purl". The rib is k1p2, don't slip the first stitch on heel, pick up stitches on every row of the heel, finally reduce instep on every round instead of every other round (this will pucker somewhat - but it seems that it was the fashion). The heel is constructed with a 3 needle bind off following the 3" heel flap and 5 rows of reducing on either side of the seam.

I think it's interesting that there is a seam created with a single purl stitch at the back of the leg. I think this may be because socks were originally sewn out of material, and the seam became a tradition rather than a necessity when they started knitting socks (not certain of this - just my idea on how the pattern evolved).


Keep on knitting!

Wednesday, December 31, 2008

B&W Bathmat Pattern (Knit)


B&W Bath Mat

Needle and yarn
Needle: US 8 / 5.0 mm
Yarn: Lion Brand Lion Cotton Print
2 skeins = 378.0 yards (345.6m)
Colorway: Black & White


CO 104 stitches - knit 8 rows

— begin repeat pattern—-

next row - slip first stitch, knit 7 - start linen stitch (knit 1, slip 1) to last 8 stitches & knit to end.

next row - slip first stitch, knit across.

next row - slip first stitch, knit 7 - start staggered linen stitch (slip 1, knit 1) to last 8 stitches & knit to end.

next row - slip first stitch, knit across.

Repeat until mat reaches desired size.

—– end repeat pattern —

Knit 8 rows and bind off.